この記事では、SwiftUI、Django-REST-Framework、Django-AllAuthを利用してユーザー登録機能を実装する方法を紹介します。
◆動作検証環境
・XCode:12.1
・django-allauth:0.43.0
・DjangoRESTframework: 3.12.1
・django-rest-auth: 0.9.5
ユーザー登録画面の構成と動作内容
まずは、iOSアプリのユーザー登録画面を作成します。
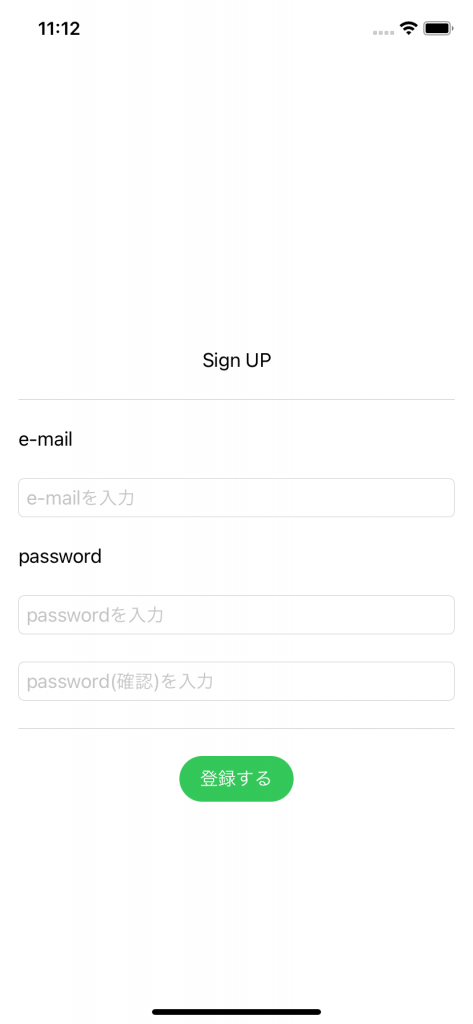
ユーザー登録画面構成の内容は以下のとおりです。
- email入力欄
- パスワード入力欄
- 確認用パスワード入力欄
- 登録ボタン

動きとしては、email、パスワードを入力し登録ボタンをタップ。
- 入力が正しければ、sheetを出し確認用メール送信を知らせる
- 入力が正しくなければ、alertを出し不備に内容を知らせる。
入力のバリデーションは、django-rest-framwork側で行い、エラーがある場合は、responseのメッセージをalertで表示させます。
ユーザー登録画面のコーディング
ContentViewで表示させるユーザー登録用画面のstructは以下の内容です。
SignUpView
1 2 3 4 5 6 7 8 9 10 11 12 13 14 15 16 17 18 19 20 21 22 23 24 25 26 27 28 29 30 31 32 33 34 35 36 37 38 39 40 41 42 43 44 45 46 47 48 49 50 51 52 53 54 55 56 57 58 59 60 61 62 63 64 65 66 67 68 69 70 71 72 73 74 75 76 77 | import SwiftUI struct BlogSignUpView: View { @EnvironmentObject var accountAPI: AccountAPI @State var eMail:String = "" @State var password1:String = "" @State var password2:String = "" var body: some View { NavigationView{ VStack{ Text("Sign UP") Divider() .padding() VStack(alignment:.leading){ Text("e-mail") .padding(.leading) TextField("e-mailを入力", text:$eMail ) .keyboardType(.emailAddress) .autocapitalization(.none) .disableAutocorrection(false) .textFieldStyle(RoundedBorderTextFieldStyle()) .padding() Text("password") .padding(.leading) SecureField("passwordを入力", text:$password1) .autocapitalization(.none) .disableAutocorrection(false) .textFieldStyle(RoundedBorderTextFieldStyle()) .padding() SecureField("password(確認)を入力", text:$password2) .autocapitalization(.none) .disableAutocorrection(false) .textFieldStyle(RoundedBorderTextFieldStyle()) .padding(.leading) .padding(.trailing) } Divider() .padding() Button(action:{ accountAPI.makeRegistration(email: eMail, password1: password1, password2: password2) }){ Text("登録する") .foregroundColor(Color.white) .frame(width: 100, height: 40, alignment: .center) .background(Color.green) .cornerRadius(50) } } }.alert(isPresented: $accountAPI.isAlertSignUp){ Alert(title: Text("入力に不備があります"), message: Text(""" \(accountAPI.alertMessageEmail) \(accountAPI.alertMessagePassword1) \(accountAPI.alertMessagePassword2) \(accountAPI.alertMessageNonField) """) ) }.sheet(isPresented: $accountAPI.isSentEmailSheet){ SentEmailSheet() } } struct BlogSignUpView_Previews: PreviewProvider { static var previews: some View { BlogSignUpView() } } } |
ポイントとなる点は以下のとおりです。
その①:
6行目:@EnvironmentObject var accountAPI: AccountAPI
API接続をするメソッドを持ち、ObservableObject プロトコルに適合するAccountAPIクラスを、@EnvironmentObject として定義します。
その②:
47行目:accountAPI.makeRegistration(email: eMail, password1: password1, password2: password2)
登録ボタンがタップされた時に入力したemailアドレスと、パスワードを渡しaccountAPI.makeRegistrationメソッドを実行します。
その③:
56行目:alert(isPresented: $accountAPI.isAlertSignUp)accountAPI.makeRegistrationメソッドを実行した際に入力に不備があった際にalertとしてエラー内容を表示します。
その④:
66行目:sheet(isPresented: $accountAPI.isSentEmailView)accountAPI.makeRegistrationメソッドを実行し入力が正しい場合は、確認用メールを送信した内容で表示します。
SentEmailSheet という名前のstructとして別ファイルで作成しています。
SentEmailSheet.swift
1 2 3 4 5 6 7 8 9 10 11 12 13 14 15 16 17 18 19 20 21 22 23 24 25 26 27 | import SwiftUI struct SentEmailSheet:View { @EnvironmentObject var accountAPI: AccountAPI @Environment(\.presentationMode) var presentationMode var body: some View{ Text("入力されたEmailアドレスに登録確認用のメールを送信しました。\n受信したメールより登録確認を行ってください。") .padding() Text("メールを受信できない場合は、入力したアドレスに誤りがないか、迷惑メールに含まれていないかを確認してください。") .padding() Button(action:{ self.presentationMode.wrappedValue.dismiss() }){ Text("閉じる").padding() } } } struct SentEmailSheet_Previews: PreviewProvider { static var previews: some View { SentEmailSheet() } } |
AccountAPI.swift
1 2 3 4 5 6 7 8 9 10 11 12 13 14 15 16 17 18 19 20 21 22 23 24 25 26 27 28 29 30 31 32 33 34 35 36 37 38 39 40 41 42 43 44 45 46 47 48 49 50 51 52 53 54 55 56 57 58 59 60 61 62 63 64 65 66 67 68 69 70 71 72 73 74 75 76 77 78 79 80 81 82 83 84 85 86 87 88 89 90 91 92 93 94 95 96 97 98 99 100 101 102 103 104 105 106 107 108 109 110 111 112 113 114 115 116 117 118 119 120 121 122 123 124 125 126 127 128 129 130 131 132 133 134 135 136 137 138 139 140 | import Foundation import Combine class BlogAccountAPI: ObservableObject { @Published var isSentEmailSheet:Bool = false @Published var isAlertSignUp:Bool = false @Published var alertMessageEmail:String = "" @Published var alertMessagePassword1:String = "" @Published var alertMessagePassword2:String = "" @Published var alertMessageNonField:String = "" func makeRegistration( email theemail:String, password1 thepassword1:String, password2 thepassword2:String) { var statusCode:Int? var messageEmail:String? var messagePassword1:String? var messagePassword2:String? var messageNonFiled:String? let email = theemail let password1 = thepassword1 let password2 = thepassword2 let endpoint: String = "https://sample.com/rest-auth/registration/" guard let url = URL(string: endpoint) else { print("Error: cannot create URL") return } var urlRequest = URLRequest(url: url) urlRequest.httpMethod = "POST" urlRequest.httpBody = "email=\(email)&password1=\(password1)&password2=\(password2)".data(using: .utf8) let session = URLSession.shared let task = session.dataTask(with: urlRequest) { (data, response, error) in guard error == nil else { print("error calling POST") print(error!) return } guard let responseData = data else { print("Error: did not receive data") return } // parse the result as JSON, since that's what the API provides do { guard let receivedData = try JSONSerialization.jsonObject(with: responseData, options: []) as? [String: Any] else { print("Could not get JSON from responseData as dictionary") return } //receivedDataの全体表示 print("The request is: " + receivedData.description) //emailのresponce if let emails = receivedData["email"] as? [String]{ let email = emails.first! messageEmail = String(describing: email) }else{ messageEmail = "OK" } //pasword1のresponce if let password1s = receivedData["password1"] as? [String]{ let password1 = password1s.first! messagePassword1 = String(describing: password1) }else{ messagePassword1 = "OK" } //pasword2のresponce if let password2s = receivedData["password2"] as? [String]{ let password2 = password2s.first! messagePassword2 = String(describing: password2) }else{ messagePassword2 = "OK" } //non fieldのresponce if let nonFields = receivedData["non_field_errors"] as? [String]{ let nonField = nonFields.first! messageNonFiled = String(describing: nonField) }else{ messageNonFiled = "OK" } } catch { print("error parsing response from POST") return } //status code 取得の作業 guard let response = response as? HTTPURLResponse else { print("Error: did not response data") return } print("The response code is \(response.statusCode)") statusCode = response.statusCode DispatchQueue.main.async { //正常にAPI接続できたとき(statusコードが201の時) if statusCode == 201{ self.isActiveLoginSheet = true //正常にAPI接続できなかった時(statusコードが200以外の時) }else{ if messageEmail != "OK"{ self.alertMessageEmail = "Eメール:\(messageEmail!)" }else{ self.alertMessageEmail = "" } if messagePassword1 != "OK"{ self.alertMessagePassword1 = "パスワード1:\(messagePassword1!)" }else{ self.alertMessagePassword1 = "" } if messagePassword2 != "OK"{ self.alertMessagePassword2 = "パスワード2:\(messagePassword2!)" }else{ self.alertMessagePassword2 = "" } if messageNonFiled != "OK"{ self.alertMessageNonField = "パスワード:\(messageNonFiled!)" }else{ self.alertMessageNonField = "" } //入力ミスのアラートを出すためのフラグをON self.isAlertSignUp = true } } } task.resume() } } |
ポイントとなる点は以下のとおりです。
5行目:
ObservableObjectプロトコルに適合させ、クラスメンバーにPublishedアノテーションを仕様する
14行目:
ユーザー登録のためにAPI接続を行うmakeRegistrationメソッドを定義(rest-authの仕様に基づき必要な値を引数で受け取る)
27行目:
rest-authの仕様に基づきエンドポイント(アクセス先URL)を設定
33、34行目:
rest-authの仕様に基づき、HTTPメソッドとHTTPボディを設定
51、57行目:
jsonObject()メソッドを実行した際の返り値を取得、その内容を確認
60、68、76、84行目:
jsonObject()メソッドを実行した際の返り値から、email,password1,password2,non_field_errorsのメッセージを項目ごとに取得。
メッセージがない場合はOKを入れる。
95、101行目:
statusコードの取得
103行目から:
statusコードを基にサインアップ画面の表示の動作の値を準備
201番の場合、登録成功用のSheet用のフラグをTrueにする
201番以外の場合、エラーメッセージを@Publishedで定義している変数に入れ、入力ミスを知らせるためのalertのフラグをTrueにする
ユーザー登録のため処理の完了確認のStatusコードは200 OK ではなく201 Created の指定とします。
*@Publishedアノテーションで定義した変数をバックグラウンドで変更する事は許可されていないため、DispatchQueue.main.async を利用して行うようにします。
バックグラウンドで行うと下記のような警告が現れます。
1 2 3 | Publishing changes from background threads is not allowed; make sure to publish values from the main thread (via operators like receive(on:)) on model updates. |
ContentView.swift
1 2 3 4 5 6 7 8 9 10 11 12 13 14 15 16 17 18 19 20 21 | import SwiftUI struct ContentView: View { @ObservedObject var accountAPI = AccountAPI() var body: some View { SignUpView() .environmentObject(accountAPI) } } struct ContentView_Previews: PreviewProvider { static var previews: some View { ContentView() } } |
ポイントとなる点は、6行目と11行目です。
ObservableObjectを継承しているAccountAPIクラスを@ObservedObjectアノテーションを利用し、変数にとりbodyの中に、environmentObject(accountAPI)として利用しています。
以上、SwiftUI、Django-REST-Framework、Django-AllAuthを利用してユーザー登録機能を実装する方法を紹介しました。