この記事では、SwiftUIでのWidget_iOS14.0のConfigtation Intentを利用した実装方法、そしてより実践的な利用方法としてCoreDataとの連携方法を紹介しています。
なおConfigtation Intentを利用しない実装方法は、こちらの記事で解説しています。
Configtation Intentを利用する実装方法でも必要となる、AppGroupの作成方法などはこちらの解説を参考にしてください。
この記事では、SwiftUIでのWidget_iOS14.0の実装方法、そしてより実践的な利用方法としてCoreDataとの連携方法を紹介しています。 ◆動作検証環境・ローカル環境:mac Catalina[…]
◆動作検証環境
・XCode:12.1
・SwiftUI:2.0
・iOS:14.0
・Life Cycle:SwiftUI App
Widget_iOS14.0(Configtation Intent)の実装方法【Widget機能の追加】
Widget機能を利用するには、まずホストとなるApp(Containing Appと呼んだりしますが、この記事ではホストAppとして説明しています)が必要となります。
通常の方法でプロジェクトを作成するか、Widget機能を利用するプロジェクトを開きます。
今回は以前の記事で紹介した、CoreDataを利用するプロジェクトの中で、Widgetを追加します。
対象のプロジェクトはこちらの記事を参考にしてください。
この記事では、SwiftUIでのCoreData の基本的な実装方法【CRUD(作成、更新、削除)】を紹介しています。簡単なタスク管理App(タスク内容とスケジュールの登録)を作成しながら解説します。 ◆動[…]

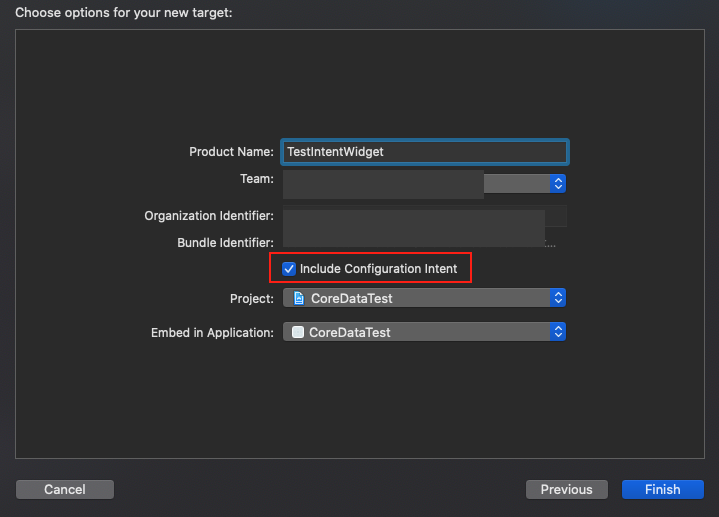
Configtation Intentを利用する場合、Targetの新規作成の際に、Include Configtation Intentにチェックを入れます。
Widget_iOS14.0(Configtation Intent)の実装方法【Widgetの表示確認】
Widgetの追加を行ったら、ホーム画面でWidgetの表示確認を行います。
ビルドするターゲットが追加したWidgetになっている事を確認し、ビルドします。
デフォルトのコードでは、Configtation Intentを利用しない場合と同様に時刻が表示されますが、Widgetを長押しすると編集用のボタンが表示されます。
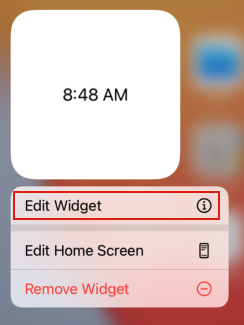
こちらをタップすると、データをより詳細に表示するなどの機能を実装できます(デフォルトの状態では編集画面が表示されるだけです)。
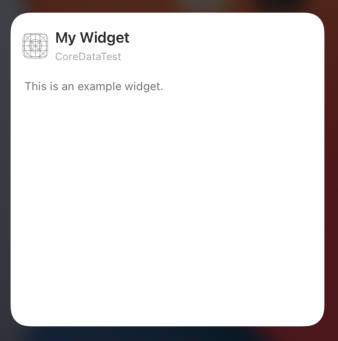
デフォルトのWidgetのファイル(この記事のサンプルではTestIntentWidget.swift)のデフォルトのコードは以下のとおりです。
1 2 3 4 5 6 7 8 9 10 11 12 13 14 15 16 17 18 19 20 21 22 23 24 25 26 27 28 29 30 31 32 33 34 35 36 37 38 39 40 41 42 43 44 45 46 47 48 49 50 51 52 53 54 55 56 57 58 59 60 61 62 63 64 | import WidgetKit import SwiftUI import Intents struct Provider: IntentTimelineProvider { func placeholder(in context: Context) -> SimpleEntry { SimpleEntry(date: Date(), configuration: ConfigurationIntent()) } func getSnapshot(for configuration: ConfigurationIntent, in context: Context, completion: @escaping (SimpleEntry) -> ()) { let entry = SimpleEntry(date: Date(), configuration: configuration) completion(entry) } func getTimeline(for configuration: ConfigurationIntent, in context: Context, completion: @escaping (Timeline<Entry>) -> ()) { var entries: [SimpleEntry] = [] // Generate a timeline consisting of five entries an hour apart, starting from the current date. let currentDate = Date() for hourOffset in 0 ..< 5 { let entryDate = Calendar.current.date(byAdding: .hour, value: hourOffset, to: currentDate)! let entry = SimpleEntry(date: entryDate, configuration: configuration) entries.append(entry) } let timeline = Timeline(entries: entries, policy: .atEnd) completion(timeline) } } struct SimpleEntry: TimelineEntry { let date: Date let configuration: ConfigurationIntent } struct TestIntentWidgetEntryView : View { var entry: Provider.Entry var body: some View { Text(entry.date, style: .time) } } @main struct TestIntentWidget: Widget { let kind: String = "TestIntentWidget" var body: some WidgetConfiguration { IntentConfiguration(kind: kind, intent: ConfigurationIntent.self, provider: Provider()) { entry in TestIntentWidgetEntryView(entry: entry) } .configurationDisplayName("My Widget") .description("This is an example widget.") } } struct TestIntentWidget_Previews: PreviewProvider { static var previews: some View { TestIntentWidgetEntryView(entry: SimpleEntry(date: Date(), configuration: ConfigurationIntent())) .previewContext(WidgetPreviewContext(family: .systemSmall)) } } |
Widget_iOS14.0(Configtation Intent)の実装方法【WidgetとCoreDataの連携】
Configtation Intentを利用するWidgetとCoreDataを連携させるには、AppGroupを利用します。
詳しくは、以前の記事を参考にしてください。
【SwiftUI】Widget_iOS14.0の実装方法【CoreDataとの連携】
今回は、CoreDataに登録されているTaskの各データをWidgetに表示し、それぞれのデータを選択するとホストAppの詳細画面に遷移する方法を解説します(通常はWidgetをタップするとホストAppのホームViewへ遷移する)。
ホストAppの編集
上記の動きに対応するために、ホストAppを以下のように編集します。
- CoreData内のTaskエンティティにユニークな情報(UUID)の追加
- 詳細画面表示の実装
CoreData内のTaskエンティティにユニークな情報(UUID)の追加
CoreDataTest.xcdatamodeld を開き、AttributesにUUID 型のid を追加します。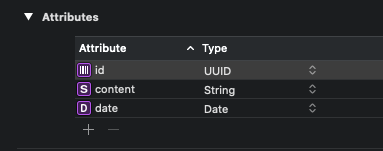
CoreDataのUUID型のidの場合、データが新規に追加されても、オートインクリメントでidが追加されません。
そのため、データ書き込み時にUUID型idを追加する処理を加えます。
データ書き込みのメソッドがあるViewModel.swift を編集します。
ViewModel.swift
1 2 3 4 5 6 7 8 9 10 11 12 13 14 15 16 17 18 19 20 21 22 23 24 25 26 27 28 29 30 31 32 33 | func writeData(context : NSManagedObjectContext ){ if updateItem != nil{ updateItem.date = date updateItem.content = content try! context.save() updateItem = nil isNewData.toggle() content = "" date = Date() return } let newTask = Task(context: context) newTask.date = date newTask.content = content newTask.id = UUID() //UUID型id追加 do{ try context.save() isNewData.toggle() content = "" date = Date() } catch{ print(error.localizedDescription) } } |
詳細画面表示の実装
まずは、詳細画面Viewの作成
DetailView.swift
1 2 3 4 5 6 7 8 9 10 11 12 13 14 15 16 17 18 19 20 21 22 23 24 25 26 27 28 29 30 | import SwiftUI struct DetailView: View { @ObservedObject var viewModel : ViewModel @State var content: String @State var date: Date @State var id:UUID var body: some View { VStack{ Text("Detail") .font(.title) .fontWeight(.bold) Divider() Text("id:\(id)") .padding() Text("content:\(content)") .font(.title) .padding() Text("date:\(date, style: .date)") .font(.title) .padding() Spacer() } } } |
次に、ContentView.swiftにHomeViewから詳細Viewへ遷移させるコードを追加します。
ContentView.swift
1 2 3 4 5 6 7 8 9 10 11 12 13 14 15 16 17 18 19 20 21 22 23 24 25 26 27 28 29 30 31 32 33 34 35 36 37 38 39 40 41 42 43 44 45 46 47 48 49 50 51 52 53 54 55 56 57 58 59 60 61 62 63 64 65 66 67 68 69 70 71 72 73 74 75 76 77 78 79 80 81 82 83 84 | import SwiftUI import CoreData struct ContentView: View { @StateObject var viewModel = ViewModel() @FetchRequest(entity: Task.entity(), sortDescriptors: [NSSortDescriptor(key: "date", ascending: true)],animation: .spring()) var results : FetchedResults<Task> @Environment(\.managedObjectContext) var context var body: some View { NavigationView{ ZStack(alignment: Alignment(horizontal: .trailing, vertical: .bottom), content: { VStack(spacing:0){ HStack{ Text("Tasks") .font(.largeTitle) .fontWeight(.heavy) .foregroundColor(.black) Spacer(minLength: 0) } .padding() .padding(.top,UIApplication.shared.windows.first?.safeAreaInsets.top) .background(Color.white) if results.isEmpty{ Spacer() Text("No Tasks") .font(.title) .foregroundColor(.primary) .fontWeight(.heavy) Spacer() }else{ ScrollView(.vertical,showsIndicators: false, content:{ LazyVStack(alignment: .leading, spacing: 20){ ForEach(results){task in NavigationLink(destination:DetailView(viewModel: viewModel, content: task.content ?? "", date: task.date ?? Date(), id: task.id ?? UUID())){ VStack(alignment: .leading, spacing: 5, content: { Text(task.content ?? "") .font(.title) .fontWeight(.bold) Text(task.date ?? Date(),style: .date) .fontWeight(.bold) Divider() }) } .foregroundColor(.primary) .contextMenu{ Button(action: { viewModel.EditItem(item: task) }, label: { Text("Edit") }) Button(action: { context.delete(task) try! context.save() }, label: { Text("Delete") }) } } } .padding() }) } } Button(action: {viewModel.isNewData.toggle()}, label: { Image(systemName: "plus") .font(.largeTitle) .foregroundColor(.white) .padding(20) .background(Color.green) .clipShape(Circle()) }) .padding() }) } .sheet(isPresented: $viewModel.isNewData, content: { NewDataSheet(viewModel: viewModel) }) } } |
WidgetExtensionの編集
CoreDataのデータをWidgetでも利用できるように、下記のように編集します。
CoreDataのタスクをWidgetに表示します。
TestIntentWidget.swift
1 2 3 4 5 6 7 8 9 10 11 12 13 14 15 16 17 18 19 20 21 22 23 24 25 26 27 28 29 30 31 32 33 34 35 36 37 38 39 40 41 42 43 44 45 46 47 48 49 50 51 52 53 54 55 56 57 58 59 60 61 62 63 64 65 66 67 68 69 70 71 72 73 74 75 76 77 78 79 80 81 82 83 84 85 86 87 88 89 90 91 92 93 94 95 96 97 98 99 100 101 102 103 104 105 106 107 108 109 110 111 112 113 114 | import WidgetKit import SwiftUI import Intents import CoreData struct Provider: IntentTimelineProvider { var moc = PersistenceController.shared.managedObjectContext init(context : NSManagedObjectContext) { self.moc = context } func placeholder(in context: Context) -> SimpleEntry { var task:[Task]? let request = NSFetchRequest<Task>(entityName: "Task") request.sortDescriptors = [NSSortDescriptor(key: "date", ascending: true)] do{ let result = try moc.fetch(request) task = result } catch let error as NSError{ print("Could not fetch.\(error.userInfo)") } return SimpleEntry(date: Date(), task: task!, configuration: ConfigurationIntent()) } func getSnapshot(for configuration: ConfigurationIntent, in context: Context, completion: @escaping (SimpleEntry) -> ()) { var task:[Task]? let request = NSFetchRequest<Task>(entityName: "Task") request.sortDescriptors = [NSSortDescriptor(key: "date", ascending: true)] do{ let result = try moc.fetch(request) task = result } catch let error as NSError{ print("Could not fetch.\(error.userInfo)") } let entry = SimpleEntry(date: Date(), task: task!, configuration: configuration) completion(entry) } func getTimeline(for configuration: ConfigurationIntent, in context: Context, completion: @escaping (Timeline<Entry>) -> ()) { var entries: [SimpleEntry] = [] var task:[Task]? let request = NSFetchRequest<Task>(entityName: "Task") request.sortDescriptors = [NSSortDescriptor(key: "date", ascending: true)] do{ let result = try moc.fetch(request) task = result } catch let error as NSError{ print("Could not fetch.\(error.userInfo)") } // Generate a timeline consisting of five entries an hour apart, starting from the current date. let currentDate = Date() for hourOffset in 0 ..< 5 { let entryDate = Calendar.current.date(byAdding: .hour, value: hourOffset, to: currentDate)! let entry = SimpleEntry(date: entryDate, task: task!, configuration: configuration) entries.append(entry) } let timeline = Timeline(entries: entries, policy: .atEnd) completion(timeline) } } struct SimpleEntry: TimelineEntry { let date: Date let task:[Task] let configuration: ConfigurationIntent } struct TestIntentWidgetEntryView : View { var entry: Provider.Entry var body: some View { VStack{ Text(entry.date, style: .time) Text(entry.task.first?.content ?? "") } } } @main struct TestIntentWidget: Widget { let kind: String = "TestIntentWidget" var body: some WidgetConfiguration { IntentConfiguration(kind: kind, intent: ConfigurationIntent.self, provider: Provider(context: PersistenceController.shared.managedObjectContext)) { entry in TestIntentWidgetEntryView(entry: entry) .environment(\.managedObjectContext, PersistenceController.shared.managedObjectContext) } .configurationDisplayName("My Widget") .description("This is an example widget.") } } |
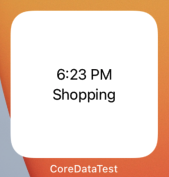
これでWidgetが下記のように表示されるようになります。
Widget_iOS14.0(Configtation Intent)の実装方法【Widget編集画面の編集】
Widgetを長押しした際の編集画面で、登録しているタスクのデータ一覧を表示させ、それぞれをタップするとホストAppの詳細画面へ遷移するように編集します。
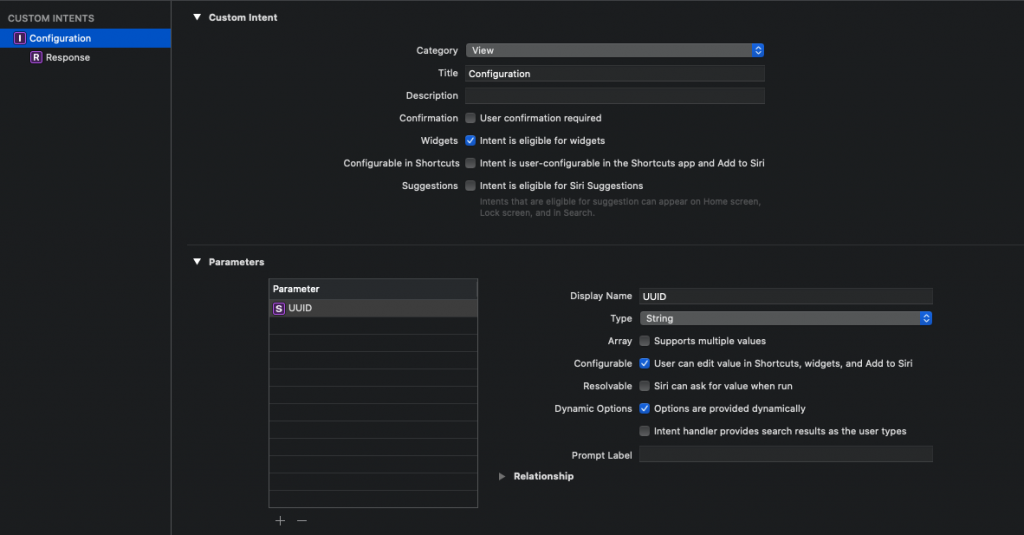
Widget機能を追加した際にフォルダ内に作成されている.intentdefinition ファイルを編集します。
デフォルトの状態は以下のようなコードになっています。
TestIntentWidget.intentdefinition
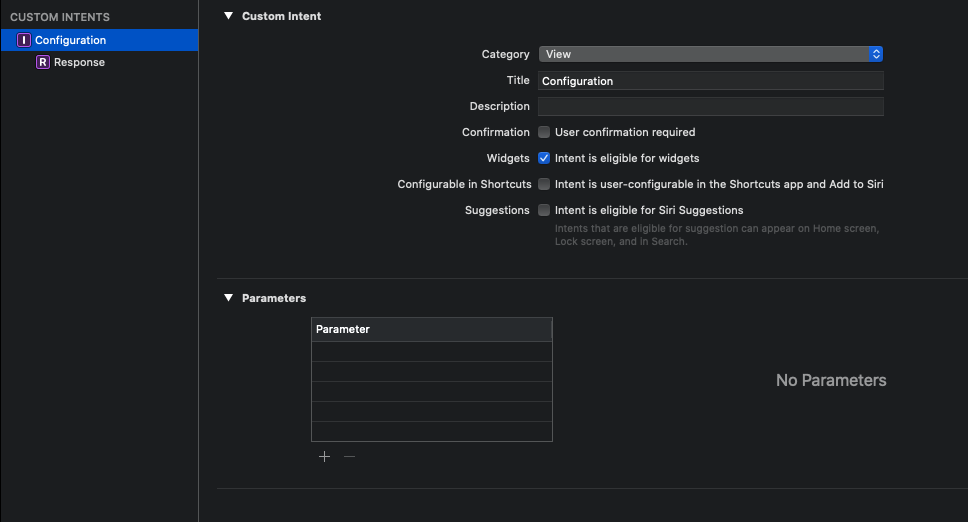
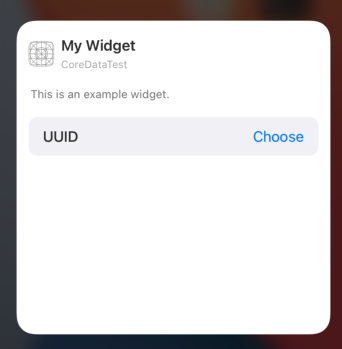
Widgetの編集画面を開いた際に、登録されているCoreDataのidの一覧が表示されるように、このファイルを編集します。
Options are provided dynamicallyにチェックを入れる事で、対象の値から選択できるようになります。
この状態でWidgetを長押しすると、編集内容が反映されています。
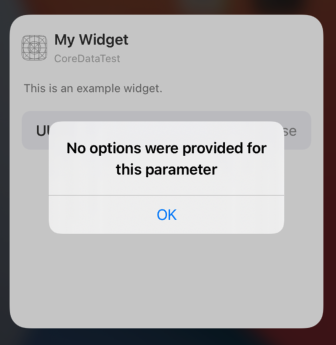
しかし、UUIDのボタンをタップしても下記のようにメッセージが表示され利用できません。
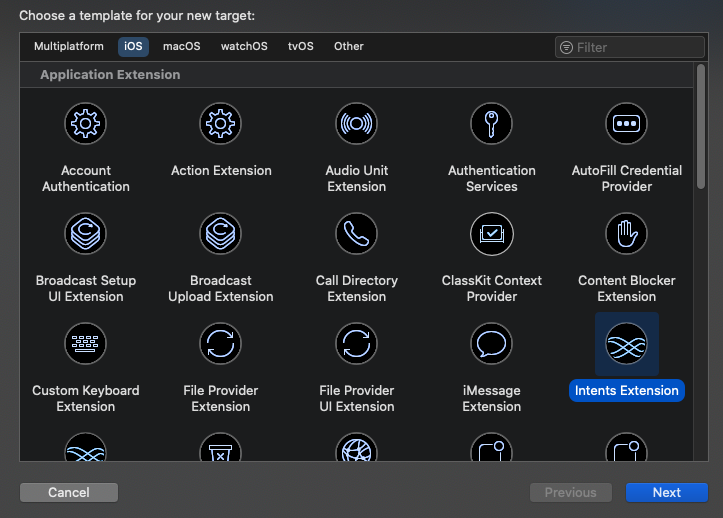
Intens機能の追加
新規Target追加から[Intents Extension]を選択します。
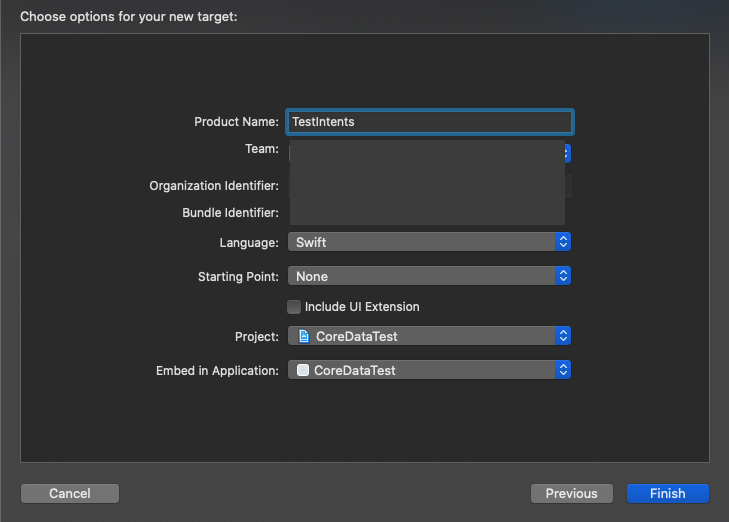
次に、Product Nameを記入し作成します。
次に作成したIntentのTargetページで編集を行います。
[General] – [Supported Intents]にConfigurationIntent のclass Nameを追加します。AuthenticationはNoneのままでOKです。
作成したclassを確認するには、作成したIntentフォルダ内のinfo.plistを確認します。
[NSExtension] – [NSExtensionAttributes] – [intentsSupported] – [Item 0]のValuで確認できはずです。
この作業を行わないと、
Unable To Install “CoreDataTest” のようなエラーメッセージが表示され、ビルドできません。
これでTestIntents フォルダが作成されます。
その中にあるIntentHandler.swift を以下のように編集します。
まずは、ホストAppのCoreDataに関係するファイルのTargetを確認します。
新たに作成された、TestIntents もTargetに追加します。
IntentHandler クラスを作成して下記のように編集します。
1 2 3 4 5 6 | import Intents class IntentHandler: INExtension, ConfigurationIntentHandling{ } |
このように、ConfigurationIntentHandling を継承させると、下記のように.intentdefinition の内容に応じXCodeから候補が出させるので、[Fix]します。
Type 'IntentHandler' does not conform to protocol 'ConfigurationIntentHandling' Do you want to add protocol stubs?
本記事の内容では、以下のようなコードとなります。
1 2 3 4 5 6 7 8 9 10 11 12 13 14 15 16 17 18 | import Intents class IntentHandler: INExtension,ConfigurationIntentHandling { func provideUUIDOptionsCollection(for intent: ConfigurationIntent, with completion: @escaping (INObjectCollection<NSString>?, Error?) -> Void) { <#code#> } override func handler(for intent: INIntent) -> Any { // This is the default implementation. If you want different objects to handle different intents, // you can override this and return the handler you want for that particular intent. return self } } |
さらに作成されたメソッドの中に、CoreDataのデータを利用できるように編集を行います。
1 2 3 4 5 6 7 8 9 10 11 12 13 14 15 16 17 18 19 20 21 22 23 24 25 26 27 28 29 30 31 32 33 34 35 | import WidgetKit import SwiftUI import CoreData import Intents class IntentHandler: INExtension,ConfigurationIntentHandling { var moc = PersistenceController.shared.managedObjectContext func provideUUIDOptionsCollection(for intent: ConfigurationIntent, with completion: @escaping (INObjectCollection<NSString>?, Error?) -> Void) { let request = NSFetchRequest<Task>(entityName: "Task") var nameIdentifiers:[NSString] = [] do{ let results = try moc.fetch(request) for result in results{ nameIdentifiers.append(NSString(string: result.id?.uuidString ?? "")) } } catch let error as NSError{ print("Could not fetch.\(error.userInfo)") } let allNameIdentifiers = INObjectCollection(items: nameIdentifiers) completion(allNameIdentifiers,nil) } override func handler(for intent: INIntent) -> Any { return self } } |
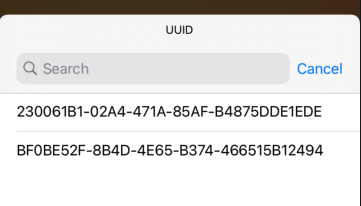
これで、Widgetを確認すると以下のように、CoreDataに登録されているUUIDの一覧が確認できるようになります。
Widget_iOS14.0(Configtation Intent)の実装方法【WidgetからホストAppの詳細画面への遷移】
WidgetからホストAppの詳細画面に遷移させるには、DeepLink機能を利用します。
DeepLink機能のおおまかな流れは、
- Widgetの編集画面で選択したボタンでWidgetURLを選択する
- ホストAppでonOpenURLが呼ばれて対象のページへ遷移する
となります。
Widget側の編集
まず、TestIntentWidgetType.swift を作成し、TestIntentWidgetType プロトコルの中でURLを選択するためのメソッドを作ります。
TestIntentWidgetType.swift
1 2 3 4 5 6 7 8 9 10 11 12 13 14 15 16 17 18 19 | import SwiftUI protocol TestIntentWidgetType { func makeURLScheme(id: UUID) -> URL? } extension TestIntentWidgetType where Self: View { func makeURLScheme(id: UUID) -> URL? { guard let url = URL(string: "CoreDataTest://detail") else { return nil } var urlComponents = URLComponents(url: url, resolvingAgainstBaseURL: true) urlComponents?.queryItems = [URLQueryItem(name: "id", value: id.uuidString)] return urlComponents?.url } } |
これで、CoreData内のそれぞれのデータに、CoreDataTest://detail?id=xxxxxxxxxxxxxx というようにURLを指定できます。
TargetMembershipでWidgetを追加もします。
続いて、TestIntentWidget.swift の編集です。
struct TestIntentWidgetEntryView の部分を以下のように編集します。
1 2 3 4 5 6 7 8 9 10 11 12 13 | struct TestIntentWidgetEntryView : View,TestIntentWidgetType { //TestIntentWidgetType追加 var entry: Provider.Entry var body: some View { VStack{ Text(entry.date, style: .time) Text(entry.task.first?.content ?? "") } .widgetURL(makeURLScheme(id: (entry.task.first?.id)!)) //widgetURL追加 } } |
ホストApp側の編集
ViewModelの編集
以下のコードをViewModel に追加します。
1 2 3 4 5 6 7 8 9 10 11 12 13 14 15 16 17 18 19 20 21 22 23 24 25 26 27 28 | enum Inputs { case openFromWidget(url: URL) } @Published var activeId: UUID? func apply(inputs: Inputs) { switch inputs { case .openFromWidget(let url): if let selectedId = getWidgetItemID(from: url) { activeId = selectedId } } } func getWidgetItemID(from url: URL) -> UUID? { guard let urlComponents = URLComponents(url: url, resolvingAgainstBaseURL: true), urlComponents.scheme == "CoreDataTest", urlComponents.host == "detail", urlComponents.queryItems?.first?.name == "id", let idValue = urlComponents.queryItems?.first?.value else { return nil } return UUID(uuidString: idValue) } |
次に、ホストAppでデータ一覧表示から詳細画面へ遷移する際のNavigationLink を編集します。
1 2 3 4 | NavigationLink(destination:DetailView(viewModel: viewModel, content: task.content ?? "", date: task.date ?? Date(), id: task.id ?? UUID()),tag:task.id ?? UUID(),selection: $viewModel.activeId){ } |
というように、tag 、selection を追加します。
そして、NavigationLink のあるViewにonOpenURL でViewModelで作ったapply メソッドを使ってモディファイアします。
1 2 3 4 5 | .onOpenURL{ url in viewModel.apply(inputs: .openFromWidget(url: url)) } |
これで、Widgetをタップすると、CoreDataの1番目のデータの詳細画面に遷移するようになります。
ここまでの編集を行い、ContentView.swiftの全コードは以下のようになっております。
1 2 3 4 5 6 7 8 9 10 11 12 13 14 15 16 17 18 19 20 21 22 23 24 25 26 27 28 29 30 31 32 33 34 35 36 37 38 39 40 41 42 43 44 45 46 47 48 49 50 51 52 53 54 55 56 57 58 59 60 61 62 63 64 65 66 67 68 69 70 71 72 73 74 75 76 77 78 79 80 81 82 83 84 85 86 87 88 | import SwiftUI import CoreData struct ContentView: View { @StateObject var viewModel = ViewModel() @FetchRequest(entity: Task.entity(), sortDescriptors: [NSSortDescriptor(key: "date", ascending: true)],animation: .spring()) var results : FetchedResults<Task> @Environment(\.managedObjectContext) var context var body: some View { NavigationView{ ZStack(alignment: Alignment(horizontal: .trailing, vertical: .bottom), content: { VStack(spacing:0){ HStack{ Text("Tasks") .font(.largeTitle) .fontWeight(.heavy) .foregroundColor(.black) Spacer(minLength: 0) } .padding() .padding(.top,UIApplication.shared.windows.first?.safeAreaInsets.top) .background(Color.white) if results.isEmpty{ Spacer() Text("No Tasks") .font(.title) .foregroundColor(.primary) .fontWeight(.heavy) Spacer() }else{ ScrollView(.vertical,showsIndicators: false, content:{ LazyVStack(alignment: .leading, spacing: 20){ ForEach(results){task in NavigationLink(destination:DetailView(viewModel: viewModel, content: task.content ?? "", date: task.date ?? Date(), id: task.id ?? UUID()),tag:task.id ?? UUID(),selection: $viewModel.activeId){ VStack(alignment: .leading, spacing: 5, content: { Text(task.content ?? "") .font(.title) .fontWeight(.bold) Text(task.date ?? Date(),style: .date) .fontWeight(.bold) Divider() }) } .foregroundColor(.primary) .contextMenu{ Button(action: { viewModel.EditItem(item: task) }, label: { Text("Edit") }) Button(action: { context.delete(task) try! context.save() }, label: { Text("Delete") }) } } } .padding() }) } } Button(action: {viewModel.isNewData.toggle()}, label: { Image(systemName: "plus") .font(.largeTitle) .foregroundColor(.white) .padding(20) .background(Color.green) .clipShape(Circle()) }) .padding() }) .onOpenURL{ url in viewModel.apply(inputs: .openFromWidget(url: url)) } } .sheet(isPresented: $viewModel.isNewData, content: { NewDataSheet(viewModel: viewModel) }) } } |
Widgetの編集
Widgetに表示されているデータの詳細画面に遷移できるようになりましたが、現在のコードではdate 順で一番上のデータが常に表示されるようになっていますので、Widgetの編集画面で選択したデータをWidgetで表示、詳細画面へ遷移できるように、下記のように編集します。
request.predicate = NSPredicate(format: "id == %@", UUID(uuidString:(configuration.UUID!))! as CVarArg) として、リクエストの条件をidでの一致としています。1 2 3 4 5 6 7 8 9 10 11 12 13 14 15 16 17 18 19 20 21 22 23 24 25 26 27 28 29 30 31 32 33 34 35 36 37 38 39 40 41 42 43 44 45 46 47 48 49 50 51 52 53 54 55 56 57 58 59 60 61 62 63 64 65 66 67 68 69 70 71 72 73 74 75 76 77 78 79 80 81 82 83 84 85 86 87 88 89 90 91 92 93 94 95 96 97 98 99 100 101 102 103 104 105 106 107 108 109 110 111 112 113 114 115 | import WidgetKit import SwiftUI import Intents import CoreData struct Provider: IntentTimelineProvider { var moc = PersistenceController.shared.managedObjectContext init(context : NSManagedObjectContext) { self.moc = context } func placeholder(in context: Context) -> SimpleEntry { var task:Task? let request = NSFetchRequest<Task>(entityName: "Task") request.sortDescriptors = [NSSortDescriptor(key: "date", ascending: true)] do{ let result = try moc.fetch(request) task = result.first } catch let error as NSError{ print("Could not fetch.\(error.userInfo)") } return SimpleEntry(date: Date(), task: task!, configuration: ConfigurationIntent()) } func getSnapshot(for configuration: ConfigurationIntent, in context: Context, completion: @escaping (SimpleEntry) -> ()) { var task:Task? let request = NSFetchRequest<Task>(entityName: "Task") request.sortDescriptors = [NSSortDescriptor(key: "date", ascending: true)] do{ let result = try moc.fetch(request) task = result.first } catch let error as NSError{ print("Could not fetch.\(error.userInfo)") } let entry = SimpleEntry(date: Date(), task: task!, configuration: configuration) completion(entry) } func getTimeline(for configuration: ConfigurationIntent, in context: Context, completion: @escaping (Timeline<Entry>) -> ()) { var entries: [SimpleEntry] = [] var task:Task? let request = NSFetchRequest<Task>(entityName: "Task") request.predicate = NSPredicate(format: "id == %@", UUID(uuidString:(configuration.UUID!))! as CVarArg) do{ let result = try moc.fetch(request) task = result.first } catch let error as NSError{ print("Could not fetch.\(error.userInfo)") } // Generate a timeline consisting of five entries an hour apart, starting from the current date. let currentDate = Date() for hourOffset in 0 ..< 5 { let entryDate = Calendar.current.date(byAdding: .hour, value: hourOffset, to: currentDate)! let entry = SimpleEntry(date: entryDate, task: task!, configuration: configuration) entries.append(entry) } let timeline = Timeline(entries: entries, policy: .atEnd) completion(timeline) } } struct SimpleEntry: TimelineEntry { let date: Date let task:Task? let configuration: ConfigurationIntent } struct TestIntentWidgetEntryView : View,TestIntentWidgetType { var entry: Provider.Entry var body: some View { VStack{ Text(entry.date, style: .time) Text(entry.task?.content ?? "") } .widgetURL(makeURLScheme(id: (entry.task?.id)!)) } } @main struct TestIntentWidget: Widget { let kind: String = "TestIntentWidget" var body: some WidgetConfiguration { IntentConfiguration(kind: kind, intent: ConfigurationIntent.self, provider: Provider(context: PersistenceController.shared.managedObjectContext)) { entry in TestIntentWidgetEntryView(entry: entry) .environment(\.managedObjectContext, PersistenceController.shared.managedObjectContext) } .configurationDisplayName("My Widget") .description("This is an example widget.") } } |
次に編集画面の表示を修正します。
現在は、UUIDが表示されており、データの内容がわかりません。
UUIDがDeepLinkで利用するので、この値を保持しながらタスクの内容を表示するために、.intentdefinition を編集します。
TYPESの追加
カスタムTYPESを利用するために新規で作成します。
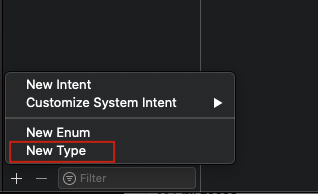
TYPE名をItemとして作成、その他設定はデフォルトのままです。
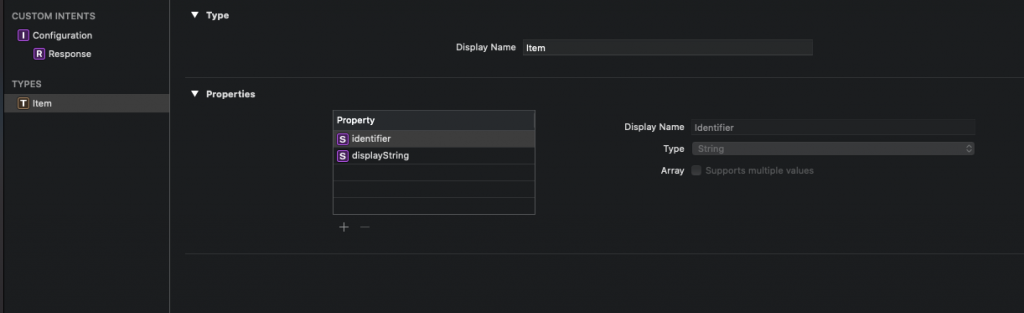
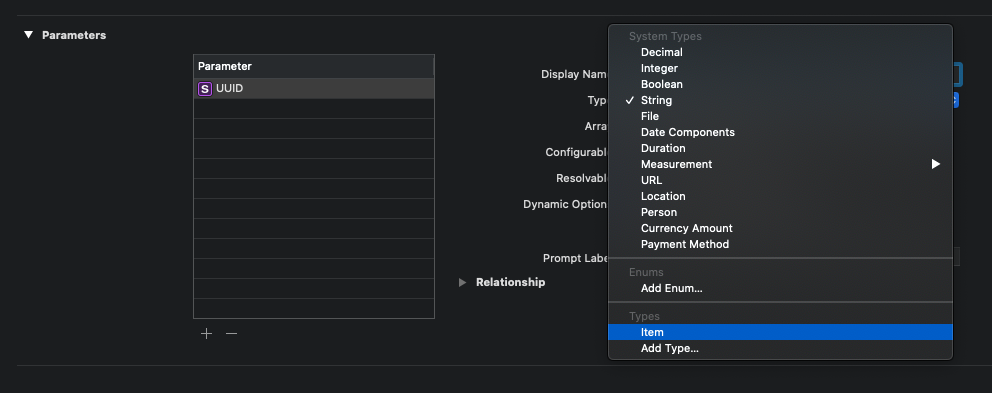
ConfigurationのTypeを作成したItemに指定します。
次にこの設定で修正が必要なコードを編集します。
IntentHandler.swift
1 2 3 4 5 6 7 8 9 10 11 12 13 14 15 16 17 18 19 20 21 22 23 24 25 26 27 28 29 30 31 32 33 34 35 36 37 | import WidgetKit import SwiftUI import CoreData import Intents class IntentHandler: INExtension,ConfigurationIntentHandling { var moc = PersistenceController.shared.managedObjectContext func provideUUIDOptionsCollection(for intent: ConfigurationIntent, with completion: @escaping (INObjectCollection<Item>?, Error?) -> Void) { let request = NSFetchRequest<Task>(entityName: "Task") var nameIdentifiers:[Item] = [] do{ let results = try moc.fetch(request) nameIdentifiers = results.map{ Item(identifier:$0.id?.uuidString, display:$0.content!) } } catch let error as NSError{ print("Could not fetch.\(error.userInfo)") } let allNameIdentifiers = INObjectCollection(items: nameIdentifiers) completion(allNameIdentifiers,nil) } override func handler(for intent: INIntent) -> Any { return self } } |
TestIntentWidget.swift
1 2 3 4 5 6 7 8 9 10 11 12 13 14 15 16 17 18 19 20 21 22 23 24 25 26 27 28 29 30 31 32 33 34 | import Foundation //追加 ... func getTimeline(for configuration: ConfigurationIntent, in context: Context, completion: @escaping (Timeline<Entry>) -> ()) { var entries: [SimpleEntry] = [] var task:Task? let request = NSFetchRequest<Task>(entityName: "Task") request.predicate = NSPredicate(format: "id == %@", UUID(uuidString:(configuration.UUID?.identifier)!)! as CVarArg) do{ let result = try moc.fetch(request) task = result.first } catch let error as NSError{ print("Could not fetch.\(error.userInfo)") } // Generate a timeline consisting of five entries an hour apart, starting from the current date. let currentDate = Date() for hourOffset in 0 ..< 5 { let entryDate = Calendar.current.date(byAdding: .hour, value: hourOffset, to: currentDate)! let entry = SimpleEntry(date: entryDate, task: task!, configuration: configuration) entries.append(entry) } let timeline = Timeline(entries: entries, policy: .atEnd) completion(timeline) } ... |
これでUUIDを利用しながら、Taskを表示する設定となりました。
お疲れ様でした。
以上、SwiftUIでのWidget_iOS14.0のConfigtation Intentを利用した実装方法、そしてより実践的な利用方法としてCoreDataとの連携方法を紹介しました。