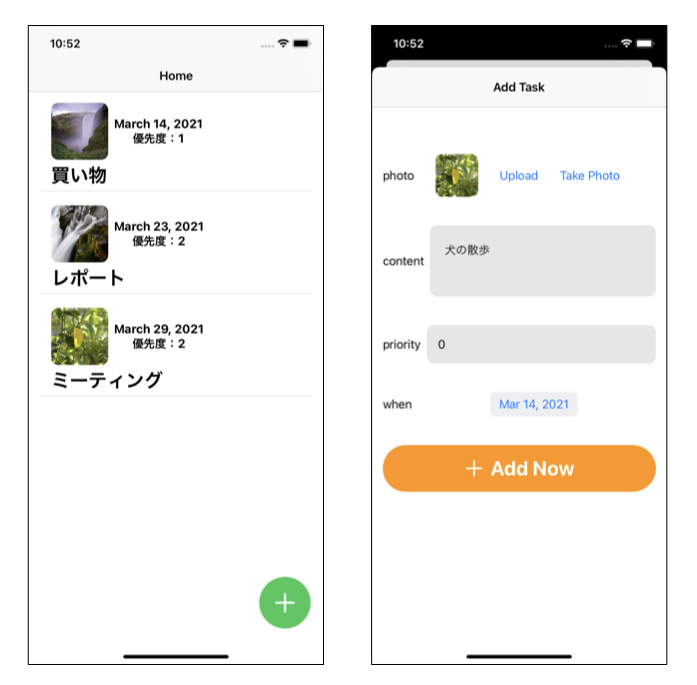
この記事では、SwiftUIでカメラで撮影した画像と、ライブラリー画像をCoreDataへ保存する方法と、CoreDataに保存されているバイナリデータを読み込んで画像として表示する方法を解説します。
過去の記事で紹介した、カメラ機能の実装方法と、CoreData の基本的な実装方法で紹介したコードをベースに解説していきます。
対象の記事は以下の2点です。
この記事では、SwiftUIでのカメラ機能の実装方法について解説します。実装例として、カメラを起動して撮影した画像と、すでに撮影されておりライブラリーに保存されている画像の利用方法を紹介します。 ◆動作検証[…]
この記事では、SwiftUIでのCoreData の基本的な実装方法【CRUD(作成、更新、削除)】を紹介しています。簡単なタスク管理App(タスク内容とスケジュールの登録)を作成しながら解説します。 ◆動[…]
◆動作検証環境
・XCode:12.1
・SwiftUI:2.0
・iOS:14.0
・Life Cycle:SwiftUI App

CameraViewの作成(表示画像の選択、撮影)
データの登録画面で、選択されている画像を確認するためのサムネイル画像の表示、ライブラリーからの画像選択、カメラ起動し撮影した画像を選択するCameraViewを作成します。
編集する際に、CoreDataに登録されている画像を表示するためと、データ登録時にViewModelクラスのメソッドを使用するために、UIImagePickerControllerで選択されたイメージのデータは、ViewModelの変数へ代入します。
以下のコードでは、loadImage メソッドを作成し、CameraView Struct内のonAppear メソッドで反映させています。
CameraView.swift
1 2 3 4 5 6 7 8 9 10 11 12 13 14 15 16 17 18 19 20 21 22 23 24 25 26 27 28 29 30 31 32 33 34 35 36 37 38 39 40 41 42 43 44 45 46 47 48 49 50 51 52 53 54 55 56 57 58 59 60 61 62 63 64 65 66 67 68 69 70 71 72 73 74 75 76 77 78 79 80 81 82 83 84 85 86 87 88 89 90 91 92 93 94 95 96 97 98 99 100 101 102 103 104 105 106 107 108 109 110 111 112 113 114 | import SwiftUI struct CameraView: View { @ObservedObject var viewModel : ViewModel @Binding var imageData : Data @Binding var source:UIImagePickerController.SourceType @Binding var image:Image @Binding var isActionSheet:Bool @Binding var isImagePicker:Bool var body: some View { VStack(spacing:0){ ZStack{ NavigationLink( destination: Imagepicker(show: $isImagePicker, image: $imageData, sourceType: source), isActive:$isImagePicker, label: { Text("") }) VStack{ HStack(spacing:30){ Text("photo") image .resizable() .aspectRatio(contentMode: .fill) .frame(width: 60, height: 60) .cornerRadius(10) Button(action: { self.source = .photoLibrary self.isImagePicker.toggle() }, label: { Text("Upload") }) Button(action: { self.source = .camera self.isImagePicker.toggle() }, label: { Text("Take Photo") }) Spacer() } .padding() } } } .onAppear(){ loadImage() } .navigationBarTitle("Add Task", displayMode: .inline) } func loadImage() { if imageData.count != 0{ viewModel.imageData = imageData self.image = Image(uiImage: UIImage(data: imageData) ?? UIImage(systemName: "photo")!) }else{ self.image = Image(uiImage: UIImage(data: imageData) ?? UIImage(systemName: "photo")!) } } } struct Imagepicker : UIViewControllerRepresentable { @Binding var show:Bool @Binding var image:Data var sourceType:UIImagePickerController.SourceType func makeCoordinator() -> Imagepicker.Coodinator { return Imagepicker.Coordinator(parent: self) } func makeUIViewController(context: UIViewControllerRepresentableContext<Imagepicker>) -> UIImagePickerController { let controller = UIImagePickerController() controller.sourceType = sourceType controller.delegate = context.coordinator return controller } func updateUIViewController(_ uiViewController: UIImagePickerController, context: UIViewControllerRepresentableContext<Imagepicker>) { } class Coodinator: NSObject,UIImagePickerControllerDelegate,UINavigationControllerDelegate { var parent : Imagepicker init(parent : Imagepicker){ self.parent = parent } func imagePickerControllerDidCancel(_ picker: UIImagePickerController) { self.parent.show.toggle() } func imagePickerController(_ picker: UIImagePickerController, didFinishPickingMediaWithInfo info: [UIImagePickerController.InfoKey : Any]) { let image = info[.originalImage] as! UIImage let data = image.pngData() self.parent.image = data! self.parent.show.toggle() } } } |
画像データをCoreDataへ保存する
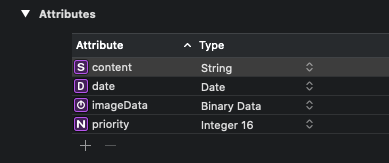
表示する画像のデータをCoreDataで扱うために、BinaryData型のAttributeを追加します。

UIImagePickerControllerで画像の値をして利用するData型でCoreDataへ保存します。
ViewModel.swift
1 2 3 4 5 6 7 8 9 10 11 12 13 14 15 16 17 18 19 20 21 22 23 24 25 26 27 28 29 30 31 32 33 34 35 36 37 38 39 40 41 42 43 44 45 46 47 48 49 50 51 52 53 54 55 56 57 58 59 60 61 62 63 64 65 | import SwiftUI import CoreData class ViewModel : ObservableObject{ @Published var content = "" @Published var date = Date() @Published var priority = 0 @Published var imageData:Data = Data.init() @Published var isNewData = false @Published var updateItem : Task! func writeData(context : NSManagedObjectContext ){ if updateItem != nil{ updateItem.date = date updateItem.content = content updateItem.priority = Int16(priority) updateItem.imageData = imageData try! context.save() updateItem = nil isNewData.toggle() content = "" date = Date() priority = 0 imageData = Data.init() return } let newTask = Task(context: context) newTask.date = date newTask.content = content newTask.priority = Int16(priority) newTask.imageData = imageData do{ try context.save() isNewData.toggle() content = "" date = Date() priority = 0 imageData = Data.init() } catch{ print(error.localizedDescription) } } func EditItem(item:Task){ updateItem = item date = item.date! content = item.content! priority = Int(item.priority) imageData = item.imageData ?? Data.init() isNewData.toggle() } } |
NewDataSheet.swift
1 2 3 4 5 6 7 8 9 10 11 12 13 14 15 16 17 18 19 20 21 22 23 24 25 26 27 28 29 30 31 32 33 34 35 36 37 38 39 40 41 42 43 44 45 46 47 48 49 50 51 52 53 54 55 56 57 58 59 60 61 62 63 64 65 66 67 68 69 70 71 72 73 74 75 76 77 78 79 80 81 82 83 84 85 86 | import SwiftUI struct NewDataSheet: View { @ObservedObject var viewModel : ViewModel @Environment(\.managedObjectContext) var context @State var imageData : Data = .init(capacity:0) @State var isActionSheet = false @State var isImagePicker = false @State var source:UIImagePickerController.SourceType = .photoLibrary @State private var image = Image(systemName: "photo") var body: some View { NavigationView{ ScrollView{ VStack{ HStack{ CameraView(viewModel: viewModel, imageData: $imageData, source: $source, image: $image, isActionSheet: $isActionSheet, isImagePicker: $isImagePicker) .padding(.top,50) NavigationLink( destination: Imagepicker(show: $isImagePicker, image: $imageData, sourceType: source), isActive:$isImagePicker, label: { Text("") }) } HStack{ Text("content") TextEditor(text: $viewModel.content) .padding() .background(Color.primary.opacity(0.1)) .frame(height: 100) .cornerRadius(10) } .padding() HStack{ Text("priority") TextField("", value: $viewModel.priority, formatter: NumberFormatter()) .padding() .background(Color.primary.opacity(0.1)) .cornerRadius(10) } .padding() HStack{ Text("when") Spacer() DatePicker("", selection:$viewModel.date, displayedComponents:.date)//日付も使用する場合は”displayedComponents:.date”をなくす .labelsHidden() Spacer() } .padding() Button(action: {viewModel.writeData(context: context)}, label: { Label(title:{Text(viewModel.updateItem == nil ? "Add Now" : "Update") .font(.title) .foregroundColor(.white) .fontWeight(.bold) }, icon: {Image(systemName: "plus") .font(.title) .foregroundColor(.white) }) .padding(.vertical) .frame(width:UIScreen.main.bounds.width - 30) .background(Color.orange) .cornerRadius(50) }) .padding() .disabled(viewModel.content == "" ? true : false) .opacity(viewModel.content == "" ? 0.5 : 1) } } } .background(Color.primary.opacity(0.06).ignoresSafeArea(.all, edges: .bottom)) } } |
CoreDataに登録されている画像データを表示する
CoreDataに登録されている画像データを、Viewに表示する際は、Data型→UIImage型、UIImage型→Image 型へ変換します。
ContentView.swift
1 2 3 4 5 6 7 8 9 10 11 12 13 14 15 16 17 18 19 20 21 22 23 24 25 26 27 28 29 30 31 32 33 34 35 36 37 38 39 40 41 42 43 44 45 46 47 48 49 50 51 52 53 54 55 56 57 58 59 60 61 62 63 64 65 66 67 68 69 70 71 72 73 74 75 76 77 78 79 80 81 82 83 84 85 86 87 88 89 90 91 92 93 94 95 96 97 98 99 100 101 102 103 104 105 106 | import SwiftUI import CoreData struct ContentView: View { init() { UITextView.appearance().backgroundColor = .clear } @StateObject var viewModel = ViewModel() @FetchRequest(entity: Task.entity(), sortDescriptors: [NSSortDescriptor(key: "date", ascending: true)],animation: .spring()) var results : FetchedResults<Task> @Environment(\.managedObjectContext) var context var body: some View { ZStack(alignment: Alignment(horizontal: .trailing, vertical: .bottom), content: { NavigationView{ VStack(spacing:0){ if results.isEmpty{ Spacer() Text("No Tasks") .font(.title) .foregroundColor(.primary) .fontWeight(.heavy) Spacer() }else{ ScrollView(.vertical,showsIndicators: false, content:{ LazyVStack(alignment: .leading, spacing: 20){ ForEach(results){task in VStack(alignment: .leading, spacing: 5, content: { HStack{ if task.imageData?.count ?? 0 != 0{ Image(uiImage: UIImage(data: task.imageData ?? Data.init())!) .resizable() .aspectRatio(contentMode: .fill) .frame(width: 80, height: 80) .cornerRadius(10) } VStack{ Text(task.date ?? Date(),style: .date) .fontWeight(.bold) Text("優先度:\(task.priority)") .fontWeight(.bold) } } .padding(.horizontal) Text(task.content ?? "") .font(.title) .fontWeight(.bold) .padding(.horizontal) Divider() }) .foregroundColor(.primary) .contextMenu{ Button(action: { viewModel.EditItem(item: task) }, label: { Text("Edit") }) Button(action: { context.delete(task) try! context.save() }, label: { Text("Delete") }) } } } .padding() }) } } .navigationBarTitle("Home", displayMode: .inline) } Button(action: {viewModel.isNewData.toggle()}, label: { Image(systemName: "plus") .font(.largeTitle) .foregroundColor(.white) .padding(20) .background(Color.green) .clipShape(Circle()) .padding() }) }) .ignoresSafeArea(.all, edges: .top) .background(Color.primary.opacity(0.06).ignoresSafeArea(.all, edges: .all)) .sheet(isPresented: $viewModel.isNewData, onDismiss:{ viewModelValueReset() }, content: { NewDataSheet(viewModel: viewModel) }) } func viewModelValueReset(){ viewModel.updateItem = nil viewModel.content = "" viewModel.date = Date() viewModel.priority = 0 viewModel.imageData = Data.init() } } |
登録処理を行うSheetでは、編集の更新を完了せずにSheetを閉じた場合に、ViewModelの変数を初期値に戻るために、viewModelValueReset メソッドを作成し、onDismiss 処理で実行します。
以上、SwiftUIでカメラで撮影した画像と、ライブラリー画像をCoreDataへ保存する方法と、CoreDataに保存されているバイナリデータを読み込んで画像として表示する方法を解説しました。

