この記事では、Djangoプロジェクトにdjango-allauthを利用してログイン認証機能を実装する方法を紹介します。
◆動作検証環境
・python:3.7.5
・Django:3.1.2
・django-allauth:0.43.0
macのローカル環境にDjangoの開発環境を設定する方法を紹介します。◆動作検証環境・ローカル環境:mac Catalina・python:3.7.5・Django:3.1.2python3のインストー[…]
django-allauth用ログインアプリケーションと、メインアプリケーションの作成
プロジェクトの仮想環境を有効化して、ログインアプリケーションを作成します。
アプリケーション名は、accountsとしました。
1 2 3 | $ python3 manage.py startapp accounts |
続いて、メインのアプリケーションを作成します。
アプリケーション名は、appとしました。
1 2 3 | $ python3 manage.py startapp app |
作成したaccounts,appアプリケーションを、project内のsettings.pyに登録します。
1 2 3 4 5 6 7 8 9 10 11 12 | INSTALLED_APPS = [ 'django.contrib.admin', 'django.contrib.auth', 'django.contrib.contenttypes', 'django.contrib.sessions', 'django.contrib.messages', 'django.contrib.staticfiles', 'accounts.apps.AccountsConfig', #追加 'app.apps.AppConfig', #追加 ] |
カスタムユーザーモデルの作成
最近ではユーザー名にメールアドレス、パスワードを設定してユーザー登録する方法が一般的です。
Djangoのデフォルトの認証方法では、ユーザー名にユーザー名(メールアドレスではない)が利用されるため、カスタムユーザーを作成し、メールアドレスでの認証方法に備えます。
accounts/models.pyの編集
1 2 3 4 5 6 7 8 | from django.contrib.auth.models import AbstractUser class CustomUser(AbstractUser): class Meta: verbose_name_plural = 'CustomUser' |
project/settings.pyの編集
1 2 3 | AUTH_USER_MODEL = 'accounts.CustomUser' #追加 |
カスタムユーザーを管理サイト(/admin)で編集できるように設定する。
accounts/admin.pyの編集
1 2 3 4 5 6 | from django.contrib import admin from .models import CustomUser admin.site.register(CustomUser) |
これまでの変更を反映させる
下記のコマンドを行うか、runボタンを利用して実行します。
1 2 3 | (venv)$ python3 manage.py makemigrations |
1 2 3 | (venv)$ python3 manage.py migrate |
django-allauthのインストールと初期設定
以下のコマンドでdjango-allauthをインストールします。
1 2 3 | (venv)$ pip3 install django-allauth |
インストール後にsettings.pyを編集します。
1 2 3 4 5 6 7 8 9 10 11 12 13 14 15 16 17 18 19 20 21 22 | # 以下の設定を追加 SITE_ID = 1 AUTHENTICATION_BACKENDS = ( 'allauth.account.auth_backends.AuthenticationBackend', # 一般ユーザー用(メールアドレス認証) 'django.contrib.auth.backends.ModelBackend', # 管理サイト用(ユーザー名認証) ) ACCOUNT_AUTHENTICATION_METHOD = 'email' # メールアドレス認証に変更する設定 ACCOUNT_USERNAME_REQUIRED = False # サインナップ、ログイン時のユーザーネーム認証をキャンセル ACCOUNT_EMAIL_VERIFICATION = 'mandatory' # サインアップにメールアドレス確認を使用 ACCOUNT_EMAIL_REQUIRED = True EMAIL_BACKEND = 'django.core.mail.backends.console.EmailBackend' # ローカルでの開発のためメールをコンソールで表示する LOGIN_REDIRECT_URL = 'app:home' # ログイン成功後の遷移先の指定 ACCOUNT_LOGOUT_REDIRECT_URL = 'app:welcome' # ログアウト成功後の遷移先の指定 ACCOUNT_LOGOUT_ON_GET = True # 確認を行わずログアウトする設定 |
ログイン、ログアウト後の遷移先に指定したViewの設定をします。
app内にtemplatesディレクトリを作成
1 2 3 | (venv)$ mkdir templates |
templatesディレクトリ内に、home.html, welcome.htmlを作成する。
app/templates/home.html
1 2 3 4 5 6 7 8 9 10 11 12 | <!DOCTYPE html> <html lang="en"> <head> <meta charset="UTF-8"> <title>home</title> </head> <body> <h1>home page</h1> </body> </html> |
app/templates/welcome.html
1 2 3 4 5 6 7 8 9 10 11 12 | <!DOCTYPE html> <html lang="en"> <head> <meta charset="UTF-8"> <title>welcome</title> </head> <body> <h1>welcome page</h1> </body> </html> |
app内のルーティングとViewの設定
さきほど作成したhome.html、welcome.htmlの設定を行います。
ルーティング
project/urls.py
1 2 3 4 5 6 7 8 9 | from django.contrib import admin from django.urls import path, include urlpatterns = [ path('admin/', admin.site.urls), path('', include('app.urls')) ] |
app内のルーティング設定
まずapp内にurls.pyを作成し、以下のように編集します。
app/urls.py
1 2 3 4 5 6 7 8 9 10 11 | from django.urls import path from . import views app_name = 'app' urlpatterns = [ path('home/', views.HomeView.as_view(), name='home'), path('welcome/', views.WelcomeView.as_view(), name='welcome'), ] |
次に、app内のViews.pyを以下のように編集します。
app/views.py
1 2 3 4 5 6 7 8 9 10 11 | from django.views import generic class HomeView(generic.TemplateView): template_name = 'home.html' class WelcomeView(generic.TemplateView): template_name = 'welcome.html' |
ここまでの編集作業が終わりましたら、一度サーバーを立ち上げ、
http://127.0.0.1:8000/home/http://127.0.0.1:8000/welcome/にアクセスし、表示を確認します。
表示が確認できたら、django-allauthのルーティング設定を行います。
project/urls.pyを以下の内容に編集します。
project/urls.p
1 2 3 4 5 6 7 8 9 10 | from django.contrib import admin from django.urls import path, include urlpatterns = [ path('admin/', admin.site.urls), path('', include('app.urls')), path('accounts/', include('allauth.urls')), ] |
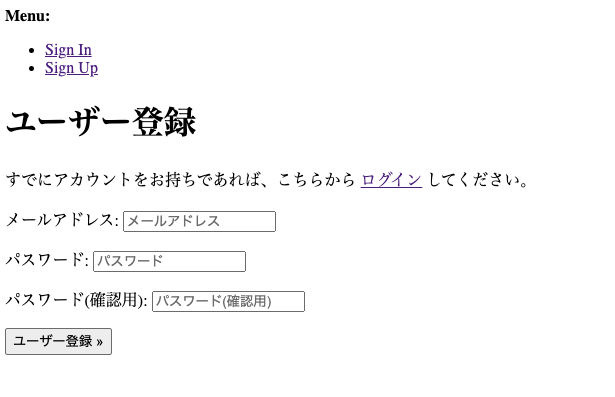
ここまでの設定が完了したら、http://127.0.0.1:8000/accounts/signup/ にアクセスし、django-allauthのデフォルトページにアクセスできるか確認します。

上記のような画面が表示されればOKです。
django-allauthデフォルトテンプレートのカスタマイズ
path('accounts/', include('allauth.urls')), のようにルーティングする事で、自分でルーティングの設定をすることなく、django-allauthがデフォルトで設定している認証関係のページを利用する事ができます。
| URL | 認証内容とURL name |
| /accounts/login/ | Login (account_login) |
| /accounts/signup/ | Signup (account_signup) |
| /accounts/logout/ | Logout (account_logout) |
| /accounts/password/set/ | Password Set(account_set_password) |
| /accounts/password/change/ | Password Change(account_change_password) |
| /accounts/password/reset/ | Password Reset (account_reset_password) |
| /accounts/email/ | E-mails Management (account_email) |
django-allauthがデフォルトで設定しているページは必要最低限の内容となっており、自分でデザインを行う方法が一般です。
templates と、account ディレクトリを作成しtemplates/account の階層の中に指定された名前でhtmlファイルを作成し、オーバーライドする事が可能です。1 2 3 4 5 6 7 8 9 10 | accounts --templates ----account ------login.heml ------signup.html ------password_reset.html ------email_comfirm.html ------etc.... |
以上、Djangoプロジェクトにdjango-allauthを利用してログイン認証機能を実装する方法を紹介しました。
参考ソース:https://django-allauth.readthedocs.io/en/latest/index.html
