この記事では、SwiftUIでのAdMob(アドモブ)広告の実装方法を紹介します。
実装の例として、Banner(バナー)広告、Reworded(リワード)広告表示のコードを作成します。
なお、Google AdMobのアカウント登録、アプリ登録、広告ユニットの作成はすでに済ませた状態で解説を行っています。
◆動作検証環境
・XCode:12.1
・SwiftUI:2.0
・iOS:14.0
・Life Cycle:SwiftUI App
CocoaPodsのインストール
まずは下記のコマンドを実行してCocoaPodsをインストールします。
※すでにインストール済みの場合は、こちらの設定は必要ありません。
1 2 3 | sudo gem install cocoapods |
インストールが終わったら、次のコマンドで初期化を行います。
1 2 3 | pod setup |
XcodeプロジェクトへCocoaPodsを導入する
導入の作業の前に、Xcodeのプロジェクトが開かれているか確認します。開いている場合はプロジェクトを閉じます。
プロジェクトディレクトリへの移動
1 2 3 | cd xcode_project |
CocoaPodsファイルの作成
1 2 3 | pod init |
Podfileの編集(KeyboardObservingの導入)
さきほどのpod init を行ったディレクトリにPodfile が作成されるので、内容を下記のように編集します。
1 2 3 4 5 6 7 8 9 10 11 12 13 | # Uncomment the next line to define a global platform for your project # platform :ios, '9.0' target 'YourApp' do # Comment the next line if you don't want to use dynamic frameworks use_frameworks! # Pods for YourApp pod 'Google-Mobile-Ads-SDK' #追加 end |
編集後に下記コマンドでKeyboardObserving のインストールを行います。
1 2 3 | pod install |
インストール後の更新作業は下記コマンドで行います。
1 2 3 | pod update |
対象のモジュールのインストール後からは、ProjectName.xcworkspace で作業、編集を行います(ProjectName.xcodeproj ではない。)
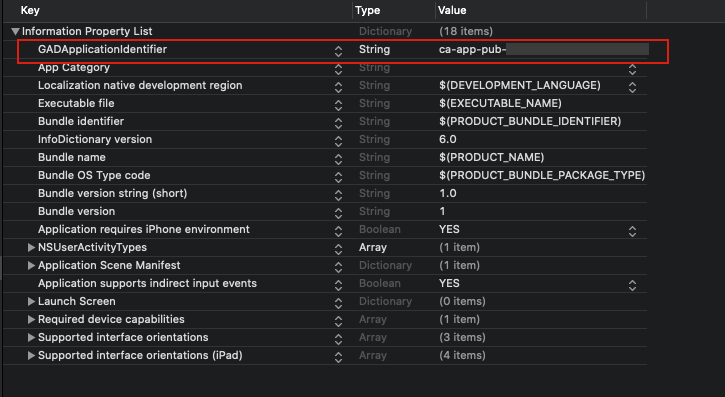
現状のままだとビルド後にエラーが発生してしまうので、Info.plistの編集を行います。
以下のKey ,Type ,Value を追加します。

Key:GADApplicationIdentifier
Type:String
Value:ca-app-pub-xxxxxxxxxxxxxxxxxxxxxxxxx~xx(自身のAppID)
これでビルドができるようになります。
Mobile Ads SDKの初期化処理
Mobile Ads SDKを初期化するために、Applicationファイル(YourProjectNameApp.swift )を編集します。
1 2 3 4 5 6 7 8 9 10 11 12 13 14 15 16 17 18 19 20 21 22 23 24 | import SwiftUI import UIKit import GoogleMobileAds class AppDelegate: NSObject, UIApplicationDelegate { func application(_ application: UIApplication,didFinishLaunchingWithOptions launchOptions: [UIApplication.LaunchOptionsKey : Any]? = nil) -> Bool { GADMobileAds.sharedInstance().start(completionHandler: nil) return true } } @main struct CoreDataTestApp: App { @UIApplicationDelegateAdaptor(AppDelegate.self) var appDelegate var body: some Scene { WindowGroup { ContentView() } } } |
【SwiftUI】AdMob(アドモブ)Banner(バナー)広告の実装
Mobile Ads SDKの初期化処理が完了した後は、広告表示用のViewを作成します。
BannerAdView.swift
1 2 3 4 5 6 7 8 9 10 11 12 13 14 15 16 17 18 | import SwiftUI import GoogleMobileAds struct BannerAdView: UIViewRepresentable { func makeUIView(context: Context) -> GADBannerView { let banner = GADBannerView(adSize: kGADAdSizeBanner) banner.adUnitID = "ca-app-pub-3940256099942544/2934735716" //こちらのadUnitIDはテスト用。本番環境では自身の広告ユニットIDに変更する banner.rootViewController = UIApplication.shared.windows.first?.rootViewController banner.load(GADRequest()) return banner } func updateUIView(_ uiView: GADBannerView, context: Context) { } } |
あとは、必要に応じてBannerAdView() を表示します。
1 2 3 | BannerAdView().frame(width: 320, height: 50) |
よく利用されるサイズはwidth: 320, height: 50です。
【SwiftUI】AdMob(アドモブ)Reworded(リワード)広告の実装
まずは、GADRewardedAdDelegate を継承するクラスを作成し、必要な変数、メソッドを作成します。
RewardedAdDelegate.swift
1 2 3 4 5 6 7 8 9 10 11 12 13 14 15 16 17 18 19 20 21 22 23 24 25 26 27 28 29 30 31 32 33 34 35 36 37 38 39 40 41 42 43 44 45 | import Foundation import GoogleMobileAds class RewardedAdDelegate: NSObject, GADRewardedAdDelegate, ObservableObject { @Published var adLoaded: Bool = false @Published var adFullyWatched: Bool = false var rewardedAd: GADRewardedAd? = nil func loadAd() { rewardedAd = GADRewardedAd(adUnitID: "ca-app-pub-3940256099942544/1712485313") //adUnitIDはtest用。本番環境では自身のユニットIDを利用する。 rewardedAd!.load(GADRequest()) { error in if error != nil { self.adLoaded = false } else { self.adLoaded = true } } } /// ユーザーが報酬を獲得したことを伝えます。 func rewardedAd(_ rewardedAd: GADRewardedAd, userDidEarn reward: GADAdReward) { adFullyWatched = true print("Reward received with currency: \(reward.type), amount \(reward.amount).") } /// リワード広告が表示されたことを伝えます。 func rewardedAdDidPresent(_ rewardedAd: GADRewardedAd) { self.adLoaded = false print("Rewarded ad presented.") } /// リワード広告が却下されたことを伝えます。 func rewardedAdDidDismiss(_ rewardedAd: GADRewardedAd) { print("Rewarded ad dismissed.") } /// リワード広告が表示されなかったことを通知する。 func rewardedAd(_ rewardedAd: GADRewardedAd, didFailToPresentWithError error: Error) { print("Rewarded ad failed to present.") } } |
次にReworded(リワード)広告のViewを作成します。
RewardedAdView.swift
1 2 3 4 5 6 7 8 9 10 11 12 13 14 15 16 17 18 19 20 21 | import SwiftUI import GoogleMobileAds struct RewardedAdView: View { @ObservedObject var rewardedAdDelegate : RewardedAdDelegate var body: some View { if rewardedAdDelegate.adLoaded && !rewardedAdDelegate.adFullyWatched { let root = UIApplication.shared.windows.first?.rootViewController self.rewardedAdDelegate.rewardedAd!.present(fromRootViewController: root!, delegate: rewardedAdDelegate) } return Button(action:{ self.rewardedAdDelegate.loadAd() }){ Text("Show RewardedAd") } } } |
このViewでは、タップされるとRewardedAdDelegate.swift で作成したloadAd() メソッドが呼ばれるボタンをリターンします。
必要なViewで使用する際は、サンプルとして以下のようなコードを作成します。
1 2 3 4 5 6 7 8 9 10 | @StateObject var rewardedAdDelegate = RewardedAdDelegate() RewardedAdView(rewardedAdDelegate: rewardedAdDelegate) Text(rewardedAdDelegate.adFullyWatched ? "true" : "false") Text("RESET") .onTapGesture { rewardedAdDelegate.adFullyWatched = false } |
Reworded(リワード)広告が表示されるには、RewardedAdView.swift で
if rewardedAdDelegate.adLoaded && !rewardedAdDelegate.adFullyWatched { } となっているように、RewardedAdDelegate.swift で定義しているadFullyWatched がfalseになっている必要があります。
一度Reworded(リワード)広告が表示されると、adFullyWatched がtrueとなります。
5行目のTextは、adFullyWatched の状態の確認ようです。
一度表示した後も続けて、表示したい場合は6行目のText(リセット)をタップすると可能になります。
利用する状況に応じて、コードを作成してください。
以上、SwiftUIでのAdMob(アドモブ)広告の実装方法を紹介しました。